
Are you ready to take your electric scooter to the next level? Wiring a 24V battery can seem daunting at first, but with the right guidance, it’s a straightforward task that can enhance your scooter’s performance significantly.
Imagine cruising with more power and extended range, all thanks to a simple upgrade that you can do yourself. You’ll discover step-by-step instructions, safety tips, and expert insights to ensure your wiring process is smooth and successful. Don’t miss out on this chance to boost your scooter’s capabilities and enjoy a ride that’s both thrilling and efficient.
Let’s dive in and get started!
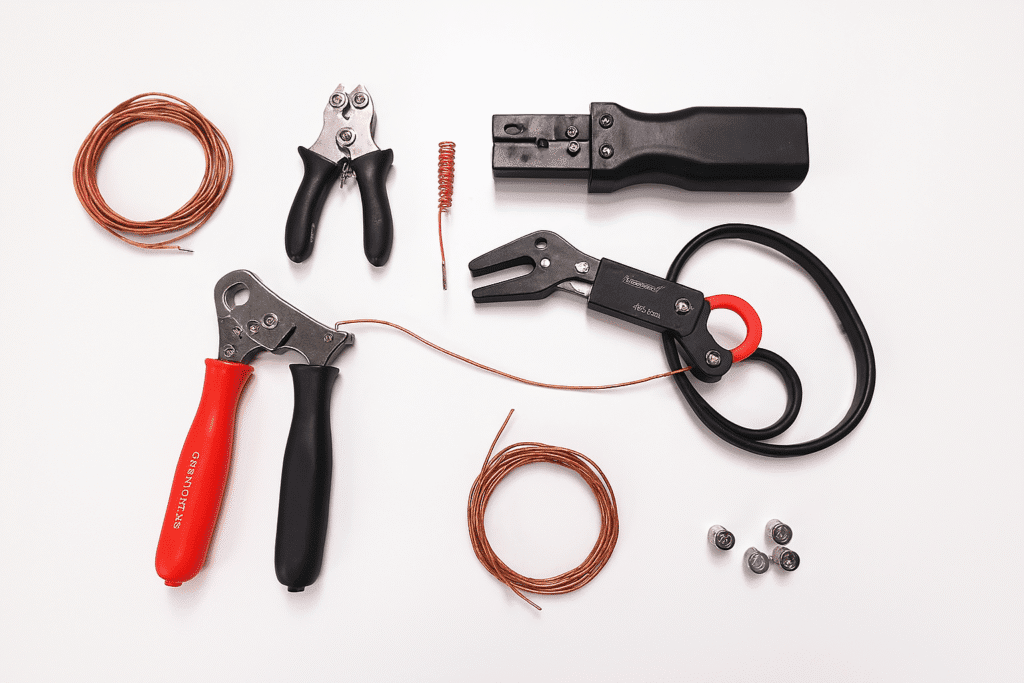
Tools And Materials Required
Prepare for wiring a 24V battery by gathering necessary tools and materials. Essential items include wire cutters, electrical tape, screwdrivers, and connectors. Ensure a safe and efficient setup with a reliable multimeter to check connections.
Wiring a 24V battery for your electric scooter is a task that can be accomplished smoothly if you have the right tools and materials. You’ll find that having everything at your fingertips not only saves time but also ensures safety and efficiency. Picture this: you’re ready to power up your scooter for that exhilarating ride, but wait—do you have the right screwdriver or the correct type of wire? Let’s dive into what you’ll need to get the job done right.
Tools Required
To start, gather a set of screwdrivers. You might be surprised at how often you’ll reach for these, whether it’s for loosening battery terminals or fitting connectors. A multimeter is crucial for checking voltage and ensuring your connections are secure. It’s a lifesaver for identifying potential issues before they become problems. Don’t forget a wire stripper for clean and precise wire cuts. It makes the wiring process much smoother and prevents unnecessary damage to the cables.
Materials Required
First and foremost, you’ll need a 24V battery. Ensure it’s compatible with your scooter and capable of delivering the power your motor demands. Connecting wires are essential. Choose wires that can handle the current without overheating. Look for quality insulated wires to prevent short circuits. A set of connectors is necessary to join wires securely. They help maintain a stable connection, reducing the risk of disconnections during your ride.
Safety Gear
Safety should be a priority. Gloves protect your hands from sharp edges and electrical shocks. A simple pair can make a big difference. Consider eye protection when working with batteries. Acid leaks or sparks can be hazardous, and protecting your eyes is a smart precaution.
Additional Items
Keep some electrical tape handy. It’s perfect for securing loose wires and ensuring they stay in place. A toolbox or organizer can be extremely useful. Keeping everything organized ensures you won’t waste time searching for that elusive screwdriver when you really need it. Are you feeling prepared to tackle wiring your scooter battery? Remember, having the right tools and materials is half the battle won. What unexpected tool do you think might come in handy during this process?
Safety Precautions
Wiring a 24V battery for an electric scooter requires careful attention to safety. Understanding the right precautions ensures your task is safe and effective. Let’s explore the key safety measures you need to consider.
Wear Protective Gear
Always wear gloves and goggles. They protect you from accidental sparks and battery acid. Ensure the gloves are non-conductive. It’s essential for preventing electric shocks.
Work In A Well-ventilated Area
Perform the wiring task in a space with good air flow. Batteries can emit gases. Adequate ventilation reduces the risk of inhaling harmful fumes. It also minimizes the risk of explosions.
Disconnect Power Sources
Before starting, disconnect all power sources. This prevents accidental short circuits. Ensure the battery is not connected to the scooter. Double-check all connections are secure before powering up.
Use Correct Tools
Use tools specifically designed for electrical work. These tools are insulated. They protect you from electric shocks. Do not use damaged tools. They can lead to accidents.
Check For Damaged Wires
Inspect all wires for damage or wear. Replace any worn-out wires before proceeding. Damaged wires can cause short circuits. This could potentially harm the scooter or cause injury.
Label All Connections
Clearly label each connection during the wiring process. This prevents confusion and errors. Proper labeling helps in troubleshooting. It also ensures future maintenance is easier.
Keep Water Away
Ensure the area is dry and free from water. Water conducts electricity. This poses a severe risk of electric shock. Keep your working space dry at all times.
Understanding Battery Specifications
Wiring a 24V battery for an electric scooter involves connecting two 12V batteries in series. This setup provides the necessary power to run the scooter efficiently. Ensure proper connections to prevent short circuits and maintain battery health.
Understanding the specifications of your electric scooter’s battery is crucial for ensuring optimal performance and safety. Before you start wiring a 24V battery, you need to know what you’re dealing with. This foundational knowledge will not only help you wire the battery correctly but also extend its lifespan and efficiency.
Voltage And Capacity
Voltage and capacity are the two critical numbers you need to understand. Voltage, measured in volts, indicates the electrical potential of your battery. A 24V battery means it provides 24 volts of electricity. It’s important not to mix batteries with different voltages. Capacity, on the other hand, is measured in ampere-hours (Ah). This tells you how long the battery can deliver power. A battery with a higher capacity will last longer on a single charge. Be sure to match the battery’s capacity with your scooter’s requirements for optimal performance.
Battery Types
Electric scooters typically use one of two battery types: lead-acid or lithium-ion. Lead-acid batteries are cheaper and heavier. They’re durable but require regular maintenance. Lithium-ion batteries are lightweight and have a higher energy density. They are more expensive but last longer and charge faster. Consider your budget and needs when selecting a battery type. When I first wired a battery for my scooter, I chose lithium-ion for its quick charge time. It made a noticeable difference in my daily commute, allowing me to charge while having breakfast. Have you considered which type of battery aligns best with your lifestyle? Understanding these specifications can make all the difference in your scooter’s performance.

Credit: dynamicscooter.com
Disconnecting Old Battery
Start by ensuring safety and turning off the power. Remove the old battery from the electric scooter. Disconnect wires carefully, noting their positions for easy reconnection.
When it’s time to replace the battery of your electric scooter, the first critical step is disconnecting the old battery. This process might seem daunting, but with a little patience and care, you can handle it smoothly. Taking the time to do it right ensures your scooter remains in great shape and ready for its new power source.
Gather Your Tools
Start by collecting the necessary tools. You’ll need a screwdriver, wrench, and a pair of gloves to protect your hands. Keep these tools within reach so you won’t have to pause midway through the task.
Ensure Safety First
Safety is paramount. Make sure your scooter is turned off and unplugged from any power source. Wearing gloves will shield your hands from any accidental sparks or sharp edges. Have you ever overlooked this step and learned the hard way? That’s a lesson worth remembering!
Locate The Battery Compartment
Identify where the battery is housed on your scooter. Typically, it’s located beneath the footboard or seat. Check your scooter’s manual if you’re unsure. Once found, open the compartment with your screwdriver.
Disconnect The Battery Cables
Begin by disconnecting the negative cable first, followed by the positive cable. Doing this in reverse might cause a short circuit. Remember that one time you mixed them up? It’s a quick way to learn the importance of sequence.
Remove The Old Battery
Once the cables are safely disconnected, gently lift the old battery out of the compartment. It might be heavier than you expect, so brace yourself. Consider how you’ll dispose of it responsibly; many local recycling centers accept old batteries.
Inspect The Battery Compartment
Before installing a new battery, inspect the compartment for any signs of corrosion or damage. Wipe away any dust or debris. A clean compartment ensures better performance and longevity for the new battery. Isn’t it rewarding to know you can tackle this task yourself? With the old battery out, you’re now ready to move on to installing the new one. Remember, each step you take not only enhances your scooter’s performance but also boosts your confidence as a DIY enthusiast.
Connecting The New 24v Battery
Wiring a 24V battery for an electric scooter is straightforward. Begin by identifying positive and negative terminals. Connect the positive terminal to the scooter’s power input, ensuring a secure connection. Link the negative terminal to the ground, completing the circuit.
Use insulated wires for safety.
Connecting a new 24V battery to your electric scooter can seem daunting, but with a few clear steps, you’ll have your scooter running smoothly in no time. Whether you’re upgrading your current battery or replacing an old one, understanding the intricacies of connecting it properly is essential. From positioning the battery correctly to ensuring all wires are securely connected, each step is crucial. Let’s dive into the details.
Positioning The Battery
First, you need to find the right spot for your new 24V battery. Most scooters have a designated battery compartment. Ensure the battery fits snugly without excessive movement. Check if the terminals are easily accessible. This accessibility will make the wiring process smoother. If you’ve ever struggled to reach a terminal, you know how important this step is. Think about balance. Placing the battery correctly can affect the scooter’s weight distribution. A well-balanced scooter is easier to maneuver and safer to ride.
Connecting The Wires
Before you start connecting, take a moment to inspect the wires. Are they in good condition? Damaged wires can lead to connectivity issues or even short circuits. Begin by connecting the positive wire to the positive terminal. It’s usually marked with a plus sign (+). Secure it tightly to avoid any loose connections. Next, attach the negative wire to the negative terminal, marked with a minus sign (-). Double-check both connections to ensure they’re secure and won’t come loose during a ride. Have you considered using cable ties? They can help keep wires neat and prevent them from snagging on other components. Remember, a secure connection is key. A loose wire can disrupt power flow and leave you stranded mid-ride. By taking the time to connect everything properly, you’re ensuring a safer and more reliable scooter experience.
Securing The Battery
Properly connecting a 24V battery ensures your electric scooter runs smoothly. Begin by gathering all necessary tools and materials. Follow clear instructions to connect positive and negative terminals correctly, prioritizing safety.
Securing the battery in your electric scooter is a vital step that ensures both safety and functionality. A loose or improperly installed battery can lead to power issues or even potential hazards while riding. Let’s dive into how you can secure your 24V battery effectively, making your rides smooth and worry-free.
Ensure Proper Battery Placement
Begin by placing your battery in the designated compartment. The snug fit will prevent it from moving around as you ride. If your battery compartment is adjustable, tailor it to fit the 24V battery perfectly.
Use The Right Tools
Having the right tools at hand makes the process easier. A simple set of screwdrivers and wrenches can work wonders. They help tighten any loose connectors and secure the battery firmly.
Double-check Connections
Secure connections are crucial. Check if the cables are connected properly and ensure there are no loose wires. A loose wire can disrupt power flow and affect your scooter’s performance.
Test For Stability
Once everything is in place, gently shake the scooter to see if the battery shifts. A stable battery won’t budge. If it moves, consider adding foam padding for extra support.
Think About Safety
Safety should always be your priority. Make sure there are no exposed wires that could short-circuit. Using electrical tape to cover any exposed areas can prevent accidents.
Consider Weather Conditions
Weather can affect your battery’s performance. If you often ride in wet conditions, ensure the battery compartment is watertight. This will help protect your battery from moisture damage.
Regular Maintenance
Regularly check your battery and its connections. Routine maintenance will help you spot potential issues early. This proactive approach can save you from unexpected breakdowns. Securing your battery might seem like a minor task, but it plays a significant role in your electric scooter’s overall performance. Have you ever experienced a sudden stop due to a loose connection? Taking the time to secure your battery can prevent this and give you peace of mind while riding.
Testing The Setup
After wiring your 24V battery for your electric scooter, testing ensures safety. It confirms everything works properly. This step catches any wiring mistakes. It prevents future problems. Follow these simple steps to check the setup.
Checking Voltage Output
Start by measuring the battery’s voltage. Use a multimeter for this. Set the multimeter to DC voltage. Connect the probes to the battery terminals. Red to positive, black to negative. The reading should match the battery’s voltage. If it shows 24 volts, the connection is good. A different reading needs investigation. Check the wiring for mistakes. Fix any loose connections.
Ensuring Proper Functionality
Now, test the scooter’s functionality. Turn on the scooter. Observe the lights and indicators. They should work as expected. Check the throttle response. It should engage smoothly. Listen for unusual sounds. Ensure the scooter moves correctly. This confirms the battery powers the system. If something seems off, recheck the setup. Correct any issues before riding. Proper testing ensures a safe ride.

Credit: support.electricscooterparts.com
Maintenance Tips
Safely connect a 24V battery to your electric scooter by following simple wiring steps. Ensure all connections are secure and use insulated wires. Regularly check for any loose wires to maintain performance and safety.
When it comes to maintaining a 24V battery for your electric scooter, a little care goes a long way. Proper maintenance not only extends the life of the battery but also ensures your scooter runs smoothly. Let’s dive into some essential maintenance tips that will keep your battery in top condition.
Regular Inspections
Regular inspections are crucial for spotting potential issues early. Check the battery connections to ensure they’re tight and free from corrosion. A loose connection can lead to power loss or even damage. Inspect the battery casing for any signs of wear or damage. Cracks or bulges might indicate a problem that needs immediate attention. Always remember, a simple inspection can save you from costly repairs down the road. Take note of your battery’s performance over time. If you notice a decrease in power or shorter ride times, it might be time for a more thorough examination or even a replacement.
Battery Storage Guidelines
Proper storage of your 24V battery is essential for longevity. Always store your battery in a cool, dry place to prevent moisture and heat from causing damage. If you’re not using the scooter for an extended period, make sure the battery is charged to about 50% before storing. A full charge or a completely drained battery can harm the internal components. Consider using a battery maintainer if you’re storing the scooter for months. This device keeps the battery at an optimal charge level without overcharging it. Have you ever thought about how a simple device could save you from replacing an expensive battery? By following these maintenance tips, you’re not just taking care of your battery; you’re ensuring your scooter remains a reliable mode of transportation for years to come.

Credit: www.amazon.com
Frequently Asked Questions
How Do I Connect A 24v Battery To A Scooter?
To connect a 24V battery, first ensure the scooter is off. Identify the positive and negative terminals. Connect the positive terminal of the battery to the scooter’s positive wire, then connect the negative terminal. Secure connections to avoid disconnections during use.
What Tools Are Needed For Wiring A Scooter Battery?
You’ll need a wrench, screwdriver, and electrical tape for wiring a 24V battery. Additionally, having a multimeter ensures connections are correct. These tools help secure terminals and verify correct voltage, ensuring safe and efficient battery installation.
Can I Use Two 12v Batteries For A 24v System?
Yes, you can use two 12V batteries in series to create a 24V system. Connect the positive terminal of one battery to the negative terminal of the other. This series connection will combine their voltages, providing the required 24V power for your electric scooter.
Is A Fuse Necessary For 24v Battery Wiring?
A fuse is essential for safety when wiring a 24V battery. It protects the electrical system from overcurrent. Without a fuse, a short circuit could damage components or cause a fire. Always include a properly rated fuse in your wiring setup for protection.
Conclusion
Wiring a 24V battery for your electric scooter is simple. Follow the steps carefully and ensure safety first. Always double-check connections to avoid errors. A secure setup means a smoother ride. Knowledge of your scooter’s wiring boosts confidence. Regular checks prevent future issues.
Remember, practice makes perfect. Your scooter’s performance depends on correct wiring. Enjoy the freedom and convenience it brings. Stay safe and happy riding!